Showing posts with label Before and After. Show all posts

9.22.2010

Bedroom Remodel, Step 1...

We are finished with the first step of the bedroom remodel. This spring, my mom asked if I wanted a bed frame that used to be my grandparents. Okay, so maybe she asked after I hinted, begged, for the bed frame. I can remember being a little kid and thinking it was SO pretty. And I want to have the kind of lasting love that both of my sets of grandparents had, so why not take their old bed!
This is what is started out looking like:

Okay, so not exactly as beautiful as I thought it was when I was a kid. But definitely had potential! I'm not a fan of much gold or brass, but I loved the lines of it. So, I do what I do best - SPRAY PAINT!!!

I'm starting to wonder if there is a such thing as spray painters anonymous, because I could possibly be addicted. Michelle, I promise I won't spray your kids if they come over to play!!

After a month of crazy busyness, I finally finished the frame and actually got it put together.

Here's a before of the room:

Well, it's kind of a during shot. It was 6:30 in the morning on a Saturday morning, so I was still half asleep and didn't realize I needed to take pictures until after we had taken the matresses off. The one thing I want to say about this bed is IT WAS LARGE! Emily even had a hard time climbing up on it. And of course, the new bed is small compared to it. But I LOVE IT!!
Here's the after:

Man alive, I really need to get the iron out on those shams. But then again it was 6:30 in the morning, so there was no ironing happening at that time in the morning! :)
Next on the list is painting the room. You can see in some of the pictures we are trying to make a final decision on color.
After that, there's a few more projects left for some wall hangings and other decorations. Stay tuned!

7.30.2010

Another Before & After...

A few weeks ago, Holly and I hit up some yard sales to see what we could find. It was a great day! I found lots of projects to work on!
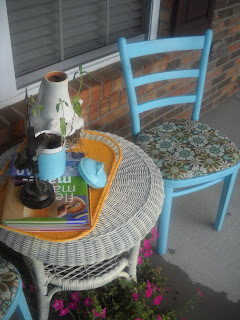
The first one was for our front porch. We had some wicker chairs passed down to us by my mom. And I love them, but they were a little too big for our little front porch. So, when I laid my eyes on these cute little chairs, I couldn't pass them up. Especially since they were $5 a piece!
Okay, now you are supposed to pretend there are two ginormous wicker chairs here. I was in such a hurry to put them away I forgot to get a "real" before pic. So you are going to have to use your imagination!

Now this is the during. I ran out of time to add any fun stuff to the table. Eventually, I would like to replace the table with a rolling cart kind of thingy and have lots more plants/flowers. But for now, this will have to do.

After a few days, I decided to shop the house to see what I might have to put out here. Just to make it look a little "homier". And this is the outcome:

Cost Breakdown:

Chairs $10

Paint $6

Fabric $2

Total: $18

Not too bad! There's so much more coming. My attic is full with lots of projects just waiting for me to find the time to do them!

2.08.2010

More Before & After...

Here's one more and then on to the big reveal of what I've really been working on all January.
I had seen on a blog (sorry I don't remember which one or I would link to it) an idea for a wreath. I've been wanting something new for my front door, but didn't want to spend a whole lot of change on it. So,this was perfect! It definitely was a tedious job, so this is not a project for an impatient person (just a warning if you are interested in doing this as well).
This is what I used:

I also took out my second favorite thing:

Yep, that's my wonderful hot glue gun! Although by the end of the project, I wasn't very happy with it because my finger tips were burnt to a crisp!

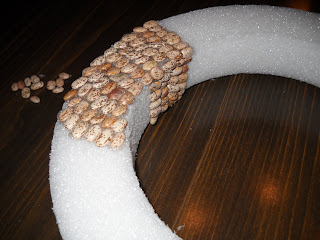
To start the wreath you take the floral foam wreath (I found mine at Hobby Lobby & then realized you can get them at the Dollar Store for cheaper - DANG IT!). You put a row of hot glue down & then add your beans. I used pinto beans, but you can really use anything you want - nuts, candy, etc. I tried to make mine go diagonal, which for the most part they did. Here's a picture of it towards the beginning:

This is what it looks like once you get all the beans on there:

Then you take your spray paint color of choice & spray paint it. I used Green Apple. Then you take a ribbon and use it to hang the wreath. Here's the completed wreath hanging:

Before & After...

it's been a while since I've blogged...no need to say it - LOTS OF STUFF GOING ON at the Barrios household in January! So, get ready for lots of updates! I want to start off with a new hobby I have - refurbishing furniture & other thrifty finds. I LOVE it!!!! I've been a follower of blogs that do the same thing for quite a while. But I never thought I could do it. But then my sweet friend Holly called me one Saturday and asked if I wanted to go to the flea market. And I jumped at the chance! I was SO excited!!! We looked around and all of a sudden - I found HER!!! My dream chair!! Although, I don't know that it looked much like a dream. This is what she looked like: So, is she calling your name too? I know she'll be calling your name when you see the after! In fact, she might be growling your name! Here's the after:

Okay, so here's all the details. It took me what felt like 3 years to take out 2 trillion rusty, old nails. It was actually about 3 hours to take out 200 rusty, old nails. My hands have still not forgiven me - I am in dire need of a manicure!

Once I had all the nails and old fabric off, I could trash the old straw that was used for the stuffing. How gross is that! No telling how much nastiness was in the straw!!

Then I did a little sanding, but not much since she was in such great shape. And finally it was time for my favorite thing in the world! SPRAY PAINT!!! Is there a such thing as being addicted to spray paint? Cause if so, I may need a support group! I used Heirloom White and it all down. Then I cut my fabric out and used a little batting as my cushion and she was ready to go.

I think I need a little more foam in the seat, but she'll do for now.

What do you think?

I'm linking to